Low Drag Drop Away Rail Buttons

8:06
High Power Water/Pyro Rocket - Part 5 - Deployment Mechanism

11:33
Launch Lugs vs Rail Buttons

15:38
How to Build a Rocket for L1 Certification (Vulpes II Rocket Launch)

10:23
High Pressure Water Rockets

10:00
How to Attach and Fold Model Rocket Parachutes!
15:51
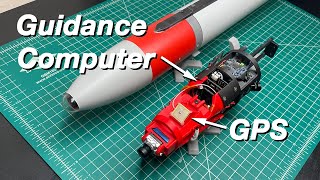
How Does This Rocket Steer Itself? -- Active Control Rocket Avionics (Building DIAMOND-X Part 2)

27:55
Certify Level 1

5:51