Lesson 18: Oscilloscope Specifications

47:15
Oscilloscope performance vs. specifications
15:34
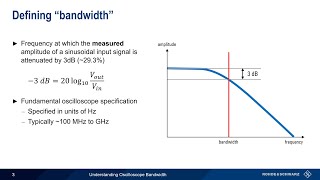
Understanding Oscilloscopes - Bandwidth
12:56
Lesson 16: Acquisition and Display Modes

9:11
What does Bandwidth mean for Oscilloscopes? - Workbench Wednesdays

10:34
What is Sample Rate and What to Be Cautious Of

14:58
Lesson 7: Probing Part 2 - Active Probes

32:01
How to use an oscilloscope / What is an oscilloscope / Oscilloscope tutorial

24:31